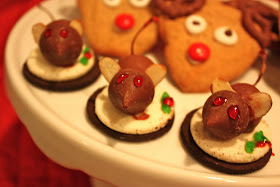
Not a creature was stirring, not even a Christmas mouse.... Last year, one of my friends introduced me to these adorable cookies! We had a ladies night and whipped up a batch for our work cookie exchange and for Cate's "school" of course.
Here are the directions!!
Christmas Mice
1 jar maraschino cherries with stems
1 package Hershey's kisses
1 package of Oreos
1 tube red decorating gel
1 tube green decorating gel
Slivered almonds
1 cup semi-sweet chocolate chips
2 teaspoons shortening
Drain cherries well and count them. Unwrap an equal amount of chocolate kisses.
1 tube red decorating gel
1 tube green decorating gel
Slivered almonds
1 cup semi-sweet chocolate chips
2 teaspoons shortening
Drain cherries well and count them. Unwrap an equal amount of chocolate kisses.
Separate the Oreo cookies keeping the cream filled side for the mice cookies.
Melt the chocolate chips and shortening in the microwave and stir till smooth. Dip the cherries in the chocolate, shake to remove excess. Position the cherries on the cream filling of the Oreo, slightly off center with the stem hanging over the edge. Dip the flat bottom of the Hershey Kiss in the melted chocolate and attach to the front of the cherry.
Melt the chocolate chips and shortening in the microwave and stir till smooth. Dip the cherries in the chocolate, shake to remove excess. Position the cherries on the cream filling of the Oreo, slightly off center with the stem hanging over the edge. Dip the flat bottom of the Hershey Kiss in the melted chocolate and attach to the front of the cherry.
Position 2 slivered almonds for ears in between the cherry and the Hershey Kiss. It took me a mouse or two to figure out to place the rounded side up instead of the pointed side. The pointed ears were just not as cute. :)
Use red gel for eyes. Use the green gel to draw 2 holly leaves slightly apart, put a red berry in the center with the red gel.
Now a few things I learned! I kept the chocolate warm by setting it in a bowl of warm water, it made it easier to dip the cherries. If you can find the larger size cherries, use those. The ones I got were kind of small and didn't fit quite right. I took a toothpick, and used some of the slightly set chocolate from the side of the bowl to fill in any holes in the cherries and to make the head and body look more connected.
If you let them set a few minutes before adding the ears, the almonds will stay in place better. I tried putting them on right away and they kept falling over.
Line a cookie sheet with wax paper to set the mice on as you put them together. When you get them all done, let them set for a few minutes before decorating.
After I took the photos, I realized I did not really "clean" up the white cream filling. These are perfect!

I also stumbled across this idea of placing them on white chocolate covered Oreos, which would save the time separating and create a perfect white base.

After finishing a few and getting our system in place, they were really easy and required NO BAKING! Just time to put them together. I promise these will be a hit! Happy Holidays!


