Monday, August 6, 2012

Up, Up, and Away!! Cate turns 3!!


Up, Up, and Away!! We celebrated Cate's third birthday party with a balloon theme this year! 

I am addicted to silhouettes lately, so I had to work that into the design of the invitation
My friend, Cara, helped me out with the little girl. Isn't she cute?!?!


The dessert table is always a BIG hit with the little ones and my favorite part of styling the party! 
I really wanted an awning this year, so my wonderful hubbie built this last minute! I am so lucky! I am already planning my next dessert table design, so I can use these again. 


The cake was FABULOUS! I sent the graphic to Melissa from Cake My Day and she nailed it! Cate wanted a strawberry cake and this was the best cake we have ever had.
 It was really moist and full of flavor. 


We served PB&J sandwiches in the shapes of balloons.


The cookie cutter I used to make the sandwiches was from Amazon.  I was not sure how well it would cut the bread, but it was amazing. Cate has been requesting all her sandwiches be in shapes now. :) 


 I used the balloon party circles to decorate all the serving pieces, etc. 


I had to think of a few activities that went along with a balloon theme for a group of 3 year olds! That was challenging. :) Especially since several of the girls were afraid of touching balloons because of the "pop" if it burst. I decided on a craft table! I even ordered crayons in the shapes of balloons! The kids used stickers, glitter sticks, and crayons to design their own balloon. 


The balloon artist was terrific. The adults were even requesting shapes.


Finally, Cate gave all her friends a goodie bag filled with balloon treats (balloon stickers, balloon shape crayons, balloon shape coloring book, etc.).


Next up, I will share the tutorial for making these balloon topiaries. :) 

Thursday, January 19, 2012

Organization Ideas

I LOVE these ideas for organizing all my ribbon!


This fabulous idea came from Creating Keepsakes Blog! I can not wait to run to Target and buy my hanger! I have a hanger bar in my "entertaining" closet because I also hang my freshly dry cleaned linens. I am giddy with excitement to go home and clean up the mess my ribbon drawer has become!


Oh Crafts featured this great idea! If you do not have a craft closet with a hanger bar, this would be an awesome way to organize your ribbon!


Monday, January 16, 2012

Yummy Valentine's Day Treats

These 2 easy Valentine's Day goodies are on my menu!

First up, Valentine's Day Buttons from Tasty Kitchen! I made these for Christmas and my family gobbled them up quickly! I am going to add a cute printable party circle for Cate's teachers. :)

Next, are these yummy Valentine's Day Blondies from Baked Perfection!

As I was searching for some tasty treats, it occurred to me that lots of the Christmas treats would also work for Valentine's Day if you modify the colors. If you have a favorite treat, please share the link!

Friday, January 13, 2012

Melting Snowmen Cookies

Aren't these melting snowman cookies adorable?!?! I have been wanting to make these for awhile and since Cate's class was learning about snow this week I whipped them up to surprise her class! Cate was so excited and proud to bring these to her class!


As you can tell, Cate was my little helper for some of these cookies. :)

My inspiration for these came from Allrecipes.com. Since I decided to make these very last minute I took a few shortcuts, but here is a great tutorial.

I actually found them relatively easy. Here are my time-savers....
  • I bought the good old-fashioned Pillsbury ready- made cookie dough.
  • I also bought Betty Crocker cookie icing - Be sure it is cookie icing because you want it to kind of harden on the cookie.
  • I used the tubes of color icing to decorate.
  • My secret weapon for decorating are Food Color Markers. I LOVE these from Wilton!


Cate loves to use these to not only decorate cookies, but her toast, pancakes, etc. I also purchased a few sets to keep on hand for play dates! Happy Baking!!

Wednesday, January 4, 2012

I Dig You!

YAY! I just ordered my red plastic shovels from Ebay to make Cate's "I Dig You!" Valentine's treats for her class. Here was the original idea on Family Fun!

Of course, I am obsessed with party circle printables, so I added this "I Dig You!" tag last year.

Use the coupon code "idigu" in the Pluff Mudd Etsy shop and get these tags or any of the Valentine's printables for 40% off. These are personalized with your child's name too!

Do you have a special request for Valentine's Day? I'm ready to add some new goodies to the shop. Send me an e-mail and I will create something custom for you!
pluffmuddstudio@gmail.com

Tuesday, January 3, 2012

Valentine's Day Digital Art

Happy New Year!!! I had taken a few months off to catch-up on life and I have missed my passion of sharing party ideas, recipes, crafts, tutorials, tips, and anything else that makes like FUN! I am ready to jump back in!!

I'm not sure about you and your family, but we miss our Christmas decorations, so I am quickly looking for some Valentine's Day ideas to get us moving to a new cute holiday! I have stumbled on quite a few adorable ideas that I can't wait to share!

Here is the first.... Have you been wondering how to get your text into a shape? This had puzzled me until I saw this tutorial from Black and White {Side by Side}. Maggie is genius!

Here is what I whipped up in minutes...
Please don't judge... these were just my experiment to see if the tutorial worked before I invested lots of time. :)

Now that I know it works, I am going to design some fun printables to pop in some frames to jazz up the mantle and party table for Valentine's Day. I even followed these directions on a Mac and it worked perfectly!!

I even used a picture to see what would happen. It is REALLY easy and you can use any shape. I can see this becoming a new favorite trick of mine!

Hurry to the tutorial by Maggie and start crafting your own printables!!

Wednesday, October 19, 2011

Cheesy Meat Loaf Minis

YUMMY!!! I am addicted to ripping new recipes out of magazines and this Cooking Light recipe for Cheesy Meat Loaf Minis was AMAZING!! Even, my 2 year old was munching it down. This has easily become a new favorite around my house!

{Photo Courtesy of Cooking Light}


Of course, I changed things up a bit to make it more mom friendly and save some time! Meals have to be quick preparation and cooking at our house! Here my tips:


  • Instead of the fresh bread crumbs that needed to be sauteed, I used Publix brand Italian seasoned bread crumbs. Worked like a charm!


  • The recipe called for cubes of white cheddar cheese. I exchanged that for regular shredded mild cheddar cheese.


  • I forgot the fresh parsley (imagine that!), so I used dried parsley.

This recipe would be easy to prepare the night before and pop in the refirgerator. Then, all you have to do is stick them in the oven when you get home! Next time, I am also going to use ground turkey for a healthier option.

Sunday, October 16, 2011

Witching Favors!!

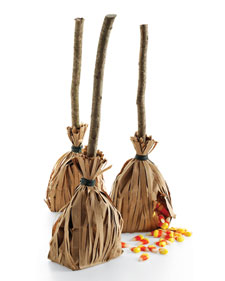
Remember the Martha Stewart witch broom favors? I saw something similar in the Family Fun Magazine, which sparked my memory of an AMAZING Amy Atlas dessert table using these adorable favors!!
{Photo from Martha Stewart}

Well, here is my spin on the Family Fun version!!!
(I am glad Cate's friends are too young to read this blog! I am always giving away a sneak peek at her treats. I will have to be more sneaky when she gets older. :) )

Witch Broom Favors!!

Of course, I added a personalized Pluff Mudd Studio Witch Halloween Party Circle!

Materials:
brown paper lunch bags
party favors (Since Cate's school is a healthy zone, I used Play Doh, spider rings, stickers, etc.)
raffia
ribbon
stick (I pulled a few from the woods. You can buy little sticks from the gardening section of any home improvement center.)
Cute Ribbon

Directions:
1. For each witch broom, use pinking shears or regular scissors to trip the top few inches of the brown paper bag.
2. Next, fill the bag halfway with treats.
3. Tie a piece of raffia around the bag about 2 or 3 inches down from the top of the bag.
4. Cut a hand full of raffia strands, so that they are the same length as the bag.
5. Use an additional piece of raffia to tie the pieces onto the bag. (I only put mine on the front of the bag, but you can do it all the way around.)
6. Add a personalized Witch Party Circle with a cute coordinating ribbon!!

I can not wait to see how excited her friends at school will be to get their special treat!

Thursday, October 13, 2011

Recipes with Candy Corn

I LOVE candy corn!!! I get so excited for October because I can not wait to run and buy candy corn. I think it may also be that candy corn means the beginning of Fall, football, Halloween, etc.


Here are a few of my favorite recipes using candy corn!!

Candy Corn Fudge


This delicious recipe was featured over at Women's Day. I love the salty pretzels with the sweet chocolate. (I am not a big fan of the cherries, so I left those out.)


Photo Credit: Tara Donne/ Woman's Day

Candy Corn Cookie Bark
I highly recommend this sweet treat from Your Homebased Mom!!! It is really easy to make and looks really festive too!!! (One of her readers commented that she used 2 bags of white chocloate chips instead of the almond bark. I did the same thing and it worked well.) WARNING: These are really sweet and addictive!


By the way, Your Homebased Mom is an AWESOME new web-site that I stumbled on. You should hop over and add her to your favorites!

Wednesday, October 12, 2011

New Pluff Mudd Halloween Printables

YAY! I just added several new Halloween printables! Hop over to the Pluff Mudd shop to check them out! You can use them as favor tags, treat bag decorations, scrapbooking, etc.


Val, from Crafty Go Lucky, really jazzed this "Boo Y'all!" tag up! Very cute! I used these these tags to attach to my favorite candy corn cookie bark for the neighbors. :) I think I may also give some goodies to Cate's teachers.


I can not wait to show you the adorable witch broom favors and party circles!


Check back for the tutorial!!!

Tuesday, October 11, 2011

Halloween Lunch Box Notes: FREEBIE

I love stashing some sweet little notes in my loved ones lunch boxes, so I wanted to come up with something to put a smile on their face! I created these adorable Halloween lunch box notes with little jokes. I thought they were really cute. Val, from Crafty Go Lucky, was very sweet to send me this photo with her lunch box note.


Download your Pluff Mudd Studio lunch box notes for Free here!
Leave us a comment about how you will use your little jokes. :)

Next up, cute favors with Pluff Mudd Studio Halloween printables! Check back to see!!!

Sunday, October 2, 2011

Tater'n Sass Giveaway!

YAY! It's giveaway time!!! Amy, from Tater'N Sass, is offering one of their adorable simply sewn baby leggings, crayon rolls, or coffee koozie to one lucky Pluff Mudd Follower!! (Winner can choose their favorite)

Check out some of the cute items goodies in her Etsy shop!! My little girl would love a crayon roll and I am crazy about the coffee koozies!!

These little leggings are precious! Perfect to keep their cute legs warm and still have easy access for diaper changing!!


HERE'S HOW TO ENTER TO WIN........

There are lots of chances to win this giveaway!
You can enter lots of times by doing any of the following
or....
You can do just ONE entry!
Just remember the more times you enter, the more chances to win.

Make sure to leave a separate comment for each action that you complete, so you have a better chance of winning! The more entries increases your odds!!! PLEASE LEAVE YOUR E-MAIL ADDRESS WITH YOUR COMMENTS, SO I CAN CONTACT THE WINNER!!!!
Good Luck!!

1. Visit Tater 'N Sass and leave a comment with your favorite simply sewn item.
2. Become a Facebook fan of Tater 'N Sass and let them know Pluff Mudd Studio sent you!
& leave your e-mail address here with a comment here that you are a fan (or already are!)
4. Become a blog follower of Pluff Mudd Studio & leave a comment here that you are a follower (or already are!)
5. Post about this giveaway on your own Blog, Facebook Page and/or Tweet about it & comment here with the links! (up to 3 entries for posting)

Winner will be chosen October 9th at 11:00pm (EST).
Any entries received after this time will not be considered. Open to US residents only.
Winner will be chosen using random.org

Thursday, August 18, 2011

Here is another very cute mermaid party from Corrie over at Teacups and Trucks! The orange and teal color scheme is precious!!! I always get a lot of inspiration from her fabulous parties and hope you do too!

The mermaid banner is available in the P.M.S. shop!


These mermaid food labels were custom designed by P.M.S. too! I loved the idea of "pearls" which were yogurt covered raisins.

Cute centerpieces!


The fishing poles were the favors and had a ticket to the Charleston aquarium 4D movie! Great party favor. The favor tags are available in the shop!

Thanks for sharing this cute party Corrie!

Tuesday, August 9, 2011

Schultüte and Tutorial

I am always on the hunt for cute back to school ideas for the kids. Have you ever heard of a Schultüte? (I had to ask my dad, who speaks German, how to pronounce this like 10 times!!!) You are going to LOVE this adorable idea and tutorial!!!

A Schultüte, school cone, is a tradition in Germany where parents give their children a paper cone filled with treats and school supplies to celebrate the first day of school. (I actually think it is specifically for first grade, but I think it could be for any year!) I think this is a great way to ease some of the anxiety and get excited for the beginning of school!

Here is a VERY EASY tutorial, so you can make your own!!

Supplies for a Schultüte:
poster board
scissors
glue stick
heavy tape, I used packing tape
Decorations: I used cute polka dot wrapping paper to cover the poster board and stamped letters, but it could be decorated with paint, crayons, paper, stickers, whatever you think your child might like.
* tissue paper
* ribbon
* treats to fill the cone (school supplies, toys, candy, etc.)

1. Cut your poster board into a large traingle.
2. Cut the wrapping paper a little larger than the triangle. (I traced my poster board and just cut it a little larger.)

3. Wrap the poster board into a cone shape and tape with clear packing tape.
4. Wrap the decorative paper around the cone and tape.
5. With a glue stick or tape, put some glue all around the outside of the cone, about one inch from the top. Then holding the cone straight between your legs, attach the tissue paper to the outside of the cone. Be sure to start at the seam of the cone. This will keep the front pretty! :)
6. (Optional) Glue a piece of ribbon around the seam of the tissue paper to dress it up! I added a little orange ruffle to Cate's cone. I stamped letters to spell Cate's name.
7. Fill the cone with lots of goodies! I put in crayons, pencils, cookies, a new hair bow, markers, etc.)
8. Either push down the tissue paper into the cone or tie it closed with a ribbon. My tissue paper was large, so could push it down and "puff" it like a gift bag. You can also use a ribbon to tie it shut.

YAY! Your kids will LOVE it! I can not wait to post a picture of Cate and her friend Jack with their school cones!!

Related Posts with Thumbnails