Monday, May 31, 2010

Buffalo-Chicken Macaroni and Cheese

I have always had a thing for Macaroni and Cheese, so I was thrilled when I saw this recipe for Buffalo-Chicken Macaroni and Cheese in the Food Network Magazine. However, I knew it was not going to be so waist friendly, so I substituted a few of the ingredients for more healthy options and the results were delicious!! I am also not a fan of real spicy, but with the right hot sauce it was perfect.


Ingredients -

  • 7 tablespoons unsalted butter, plus more for the dish
  • Kosher salt
  • 1 pound elbow macaroni (substituted whole wheat noodles)
  • 1 small onion, finely chopped
  • 2 stalks celery, finely chopped
  • 3 cups shredded rotisserie chicken
  • 2 cloves garlic, minced
  • 3/4 cup hot sauce (used Frank's buffalo hot sauce)
  • 2 tablespoons all-purpose flour
  • 2 teaspoons dry mustard
  • 2 1/2 cups half-and-half (substituted 2 cups Fat Free)
  • 1 pound yellow sharp cheddar cheese, cut into 1-inch cubes (about 3 1/2 cups) (substituted 2% cheese)
  • 8 ounces pepper jack cheese, shredded (about 2 cups) (substituted Cabot's reduced fat)
  • 2/3 cup sour cream (substituted fat free)
  • 1 cup panko (Japanese breadcrumbs) (substituted regular bread crumbs)
  • 1/2 cup crumbled blue cheese (substituted reduced fat gorgonzola)
  • 2 tablespoons chopped fresh parsley

Directions

Preheat the oven to 350 degrees F and butter a 9-by-13-inch baking dish. (The 9 by 13-inch pan is a close fit, I would recommend a 9 by 15-inch) Bring a large pot of salted water to a boil; add the pasta and cook until al dente, about 7 minutes. Drain.

Meanwhile, melt 3 tablespoons butter in a large skillet over medium heat. Add the onion and celery and cook until soft, about 5 minutes. Stir in the chicken and garlic and cook 2 minutes, then add 1/2 cup hot sauce and simmer until slightly thickened, about 1 more minute.

Melt 2 tablespoons butter in a saucepan over medium heat. Stir in the flour and mustard with a wooden spoon until smooth. Whisk in the half-and-half, then add the remaining 1/4 cup hot sauce and stir until thick, about 2 minutes. Whisk in the cheddar and pepper jack cheeses, then whisk in the sour cream until smooth.

Spread half of the macaroni in the prepared baking dish, then top with the chicken mixture and the remaining macaroni. Pour the cheese sauce evenly on top.

Put the remaining 2 tablespoons butter in a medium microwave-safe bowl and microwave until melted.(I ended up needing to add more butter because I used regular bread crumbs.) Stir in the panko, blue cheese and parsley. Sprinkle over the macaroni and bake until bubbly, 30 to 40 minutes. Let rest 10 minutes before serving.

This dish is moving up on my list for cook-outs, potluck dinners, casseroles, etc. It easily feeds 6 people and will surely be a crowd pleaser. Bon Appetit.

Stella and Dot Giveaway Winner!

Winner of the Stella and Dot Giveaway
Comment #18 Meredith (Auntie M) - Congratulations!!

True Random Number Generator 17Powered by RANDOM.ORG

Thursday, May 27, 2010

Pretty Envelopes

After spending so much time designing beautiful invitations, I want the envelopes to look pretty too. I am always on the hunt for an alternative to plain white envelopes. I've used a variety of colored envelopes, bright ink pens and pretty handwriting, and I also love to use color stickers they sell at our local stationary shop, but I love the idea of coordinating designer labels. How excited would you be to open your mailbox and pull out one of these bright colorful designer envelopes?


I quickly designed these labels for our moving announcement. For my first try, I think they turned our pretty cute. The return address wraps around the back of the envelope.


I can't wait to show the vibrant pink and green labels for Cate's birthday invitations. I promise to post pics soon. Feel free to send pics of your favorite envelopes.

Don't forget tomorrow is the last day to register for the Stella and Dot Giveway.

Wednesday, May 19, 2010

Rainbows n' Ruffles

I LOVE this party featured at Hip Hooray!! The colors of the rainbow are so vibrant and all the little details make this party SUPER!! The inspiration for this party came from this adorable vintage inspired rainbow invitation collection.

Don't you just love these umbrellas hanging above the dessert table??? I love this alternative to our favorite tissue pom poms.


Oh La La... I am crazy about this table cloth with the cascades of color and ruffles!! (Yes, she knew pink was not in the rainbow, but her daughter put in a special request.) This is one of those special details!!


Aren't these yellow rain boots with the ribbon wands the perfect centerpiece?? I think I need a tutorial for those ribbon wands.


I am an addict to Krispy Kreme Doughnuts, especially if "HOT" sign is on. My car automatically pulls into the drive through for a warm gooey treat, so it is not surprise I am giddy over these colorful treats.

The rainbow cupcakes are precious and of course you can't have a Rainbow Party without the pot of gold.


This cake is adorable and looks so yummy!! (You can find the recipe over at Whisk Kid.) I think the "Happy Birthday" party circles, tall skinny candles, and ribbon cake garland make this cake so festive (not to mention the multiple bright colored layers!!)

The ladies at Hip Hooray post some great parties. I highly recommend you hop over to their site for more details and ideas.

Tuesday, May 18, 2010

More Bling!!

I am in heaven!! There is a little more bling on the blog because Pluff Mudd Studio was featured on Tip Junkie!

Laurie shared several cooking tutorials and foodie tips. The post included my favorite new Stay-Brite cupcake liners from Reynolds.
Check out the original Pluff Mudd post for more details!
WOW!! This has been a fantastic week. I am smiling from ear to ear.

PS - Don't forget to register for the Stella and Dot earrings!!! Remember you have to leave a comment to qualify to win......

Monday, May 17, 2010

YIPPEE - I Was Featured!!!

Yippee! I was thrilled yesterday to open an e-mail from Tanya at Save the Date for Cupcakes!! I was doing a little dance to add my first "I've Been Featured Button!!

Tanya showcased an amazing Kentucky Derby Dessert table with lots of yummy treats. I LOVE the green grass and brown sugar race track. SO CUTE!!! Do you recognize the cupcake toppers? You guessed it! These were a freebie a few weeks ago and I am jumping in my kitchen to see them in this AWESOME dessert table!!!


The cookies even match the graphic on the cupcake topper!!

Be sure to visit Save the Date for Cupcakes for more details about the dessert table and party!!

Sunday, May 16, 2010

HeyYoYo

I get so excited when I find a new store that has fun party accessories and I am over the moon with the Etsy shop HeyYoYo! It has a ton of amazing party supplies that are very affordable and unique. They also have a BIG collection of vintage inspired items, circus, polka dot, etc. I LOVE this vintage bike cake topper!!

I would love for you to share some of your favorites!!!

Saturday, May 15, 2010

Mini Root Beer Float Cupcakes

Check out these AMAZING Mini Root Beer Float Cupcakes from Gourmet Mom On-The-Go!!! This is one web-site to add to your favorites list! I think these would be the perfect addition to a Sweet Shoppe Party or any dessert table. I can not wait to whip these up! They are so cute!!!

Here is the recipe from Mandy!!

Mini Root Beer Float Cupcakes
Makes 32
Ingredients:
1 pkg. Betty Crocker Vanilla Cake Mix
1 Tbsp. Root Beer Extract (in the spice aisle w/ the other extracts)
1 can Root Beer (you can use diet to cut the sugar)
Creme Roulee wafer cookies
Vanilla Icing (storebought or your favorite recipe)
Red Mini Gumballs (or M & M's or other red candy)
Clean votive candle holders or shot glasses

Directions:
Preheat oven to 350 degrees. Place 1 Tbsp. root beer extract in 2 C. measuring cup (you'll have extract left over for another batch!:)). Fill cup with Root Beer until it reaches 1 1/2 C. Add to cake mix and stir well. No eggs, no oil, easy!!

Place shot glasses/votive holders on a baking sheet and spray with nonstick cooking spray. Fill 1/2 full with cake batter and bake at 350 degrees for 18-22 minutes until done. Remove from oven and let cool completely.

Cut creme roulee wafers in half. These are my favorite!! So Yummy!

Put vanilla icing in canvas bag with a star tip (or you can just put it in a ziploc baggie and snip off one end). Pipe a dollop of icing onto each cupcake, top with a gumball and half of a wafer cookie. Serve or refrigerate until needed.

Be sure to head over to Gourmet Mom On-The-Go for the creative original Mini Root Beer Float Cupcakes and lots of other fantastic ideas!

Photos and Recipe from Gourmet Mom On-The-Go


Thursday, May 13, 2010

Stella and Dot Giveaway!

Stella and Dot is one of my favorite spots for affordable and stylish jewelry. Even the celebrities are sporting Stella and Dot fashions. After I first learned about the jewelry, I started noticing it in lots of magazines, women wearing fun pieces, etc. It's like when you get a new car and you start noticing that model everywhere. There is Stella and Dot buzz everywhere and you will start to notice now too!!! Jennifer Burch, a Stella and Dot stylist, is giving away a FABULOUS pair of Gold Leaf earrings to one lucky Pluff Mudd follower.


ENTER TO WIN NOW!
Enter lots of times by doing any one of the following!
Make sure to leave a separate comment for each action that you complete, so you have a better chance of winning! The more entries increases your odds!!! Good Luck!!

1. Hop over to the Jenn's Stella and Dot web-site,
come back & leave a comment with your favorite item!
2. Become a fan of Pluff Mudd Studio on Facebook
& leave a comment here that you are a fan (or already are!)
3. Become a blog follower of Pluff Mudd Studio & leave a comment here that you are a follower (or already are!)
4. Post about this giveaway on your own Blog, Facebook Page and/or Tweet about it & comment here with the links! (up to 3 entries for posting on each)

Winner will be chosen on Friday, May 28 at 11:00pm (EST).
Any entries received after this time will not be considered. Open to US residents only.
Winner will be chosen using random.org

Crayola Party!

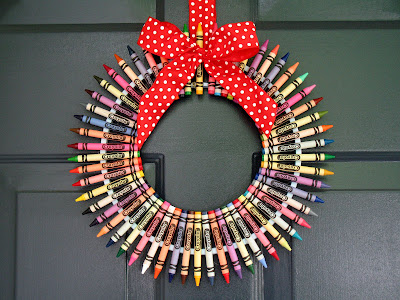
I stumbled across a new blog that I think has a lot of creative ideas, Maddycakes Muse. I LOVE the idea of a Crayola Art Party because it could be a birthday party, play date, neighborhood gathering, etc. It also entertains and excites both boys and girls. Michelle, owner of Maddycakes Muse, features this cute party from a very talented mommy, Jennifer. There are so many details that caught my eye, but the wreath is adorable! What a cute way to welcome the guests!

Aren't those cakes cute???? I love all the bright colors.

The edible crayons are very creative and super easy to make! Check out Gourmet Mom on-the-G0 for directions and printable labels. This would be a very cute snack to send to a school party.

The favor pails are precious. What child would not want one of these?

These BIG crayons are actually plastic banks sold at Toys R Us. Every summer/back yard party needs a drink station.

There were several stations set-up throughout the yard with different art projects. I love the signs labeling each station. I will have to borrow this idea.

The ideas are endless with this theme!!!!

Monday, May 10, 2010

Teacher Appreciation "Sweet and Salty" Celebration

I promised pics of our teacher appreciation "Sweet and Salty' celebration, so here they are. I think it came together nicely for quick planning and set-up. (Thanks Tammy and Wanda for indulging my obsession for parties!)

Of course, I made the cupcake toppers! We kept with the flip flop theme and bright colors throughout. These flip flop tags and a summer theme set are available at my Etsy store.


Here are the yummy Oreo Pops! I added the pink polka dot ribbon to the white clay pot to coordinate with the other colors and ribbons on the table. I chose to use all white serving pieces since there were so many colors in the decorations, etc.


The flower flip flop tree served as the table centerpiece and was a BIG hit. This was the inspiration for the theme and party colors. We had a blast making it and I am sure it will reappear at many different parties. I will post directions and hints soon.

The teachers all left with a party favor of course! We monogrammed tote bags that would be perfect for the beach or to carry school supplies. The teachers were so excited that we secretly collected their initials to add that personal touch to their gift. I made their gift tags with a 3 inch circle punch and coordinating graphics from the cupcake collection!


I think the celebration was fantastic! I am celebrating myself too because I am down to the last couple of boxes from our move! I have missed posting, so I am glad to be able to share more ideas soon.

Thursday, May 6, 2010

Oreo Pops!

WOW - It has been busy around here. My house sold in 4 days (I thought it would take a year or so.). We packed and moved this weekend for a quick 30 day closing. We found a great condo until our house is ready for us to move-in, which by the way is July 2011. Meanwhile, I volunteered to make these yummy Oreo pops for a teacher appreciation Sweet and Salty table. I originally saw this tutorial over at How Does She and I thought I can do this! I am so glad I took on this new recipe because it was really easy for something cute and creative. This is a great treat to add to your bag of tricks. Perfect for school parties, favors, dessert tables, treats for the neighbors, etc.

Ingredients and Materials:
Oreos (any flavor)
melting chocolate (It took me 2 bags for one package of cookies.)
sprinkles
cookie icing
wax paper
sucker sticks
small treat bags
ribbon

Here are the directions and few additional pointers!

Melt the chocolate according to the directions on the package. I used chocolate made by Wilton and I thought I would be fancy and use my double boiler. However, it was much easier to melt the chocolate in the microwave. I also only bought one bag.. BIG mistake. Since this was my first try, I overheated the chocolate and it was too thick to dip the cookies. Be sure to have a bag or 2 on hand for mistakes. Once I figured it all out, I needed 2 bags for 1 package of Oreos. Next tip - Only melt a little to place the sticks. Then, go back and melt the majority of the chocolate when you are ready to dip the Oreo suckers.

Separate the Oreos and line them on a tray. You do not want the chocolate to get cold, so having these divided helps a lot. At first, I had a hard time to get the stick to remain in the middle without breaking the cookie. Here is my trick - twist the stick with the hot melted chocolate into the Oreo cream and keep twisting. This will make a bed for the stick to lay in between the layers. I had 2 sizes of sucker sticks and the longer ones worked better for my project. If you are going to place them in a vase, container, etc. you want enough stick leftover to be visible.

Gently place the cookie on top the stick and place on the wax paper to cool.

I jumped the gun and started to dip these cookies too soon! I discovered that placing them in the refrigerator for a few hours made them nice and strong.

Dip the cookies in the yummy melted chocolate and place on a piece of wax paper.

I used cookie icing to add the green stripes.

If you want to add sprinkles, be sure to do it when the chocolate is still hot.

After the suckers have cooled, package them in small clear treat bags and seal with a ribbon. I used a white flower pot and added floral foam. I covered the top with glass beads and pushed the suckers into the foam. Voila - Oreo Cookie Pops. I am sure these will make an appearance in pink and green for Cate's birthday party. We chose a flip flop summer theme for this celebration. The Sweet and Salty table of course will have cupcakes with my party circles and an amazing flip flop centerpiece. I promise to post pics and a tutorial.
Related Posts with Thumbnails